Quick and dirty 2D HEC-RAS modeling
- Bobby Douglass
- May 1, 2024
- 5 min read
Check out this tutorial for a quick and robust way to model flood inundation in a small watershed using HEC-RAS 2D (note, this is not rain-on-grid, ROG, rain on mesh, etc). You should have at least moderate modeling experience in HEC-RAS (1D or 2D), so that you understand the general layout and high level principles. THE ABSOLUTE BEST WAY TO LEARN IS BY CLICKING THROUGH YOURSELF SO DOWNLOAD THESE FILES HERE AND FOLLOW ALONG.


Create a new RAS project file
Note, file/folder management is key in good modeling practice with HEC-RAS. If you don't have a system in place let me know and I can help guide you with some best practice's.
Open RAS Mapper and set your projection. I saved the common ones I used in my default project folder (see note above regarding file/folder management). See the red circle in the screenshot below
https://spatialreference.org/ is a good website to download common state plane coordinate systems (among others). I searched "Alabama state plane" in the top right and found my respective NAD 1983 East/West (FIPS 0101 & 0102)
Find you project site by adding web imagery or importing a Map file/reference file.
Navigating to your site from anywhere in the world is a good habit to learn to better familiarize yourself with the surrounding area and force you to think about the fact your model is trying to replicate a real world flooding event/design storm event (or whatever you are modeling).
Download topo data.
RAS has some good documentation (see note below) located here on this. I typically source 1-meter DEM and let RAS convert and re-project it for me in the background.
The HEC confluence site that hosts RAS & HMS documentation was recently down for a substantial period. I liked that site's layout and search functions, but I always prefer to rely on PDF or printed manuals for this reason. As of this writing in December of 2023, it's back up. ALWAYS DOWNLOAD APPLICABLE PDF MANUALS WHEN DOWNLOADING THE SOFTWARE
Create a new geometry. Name it how you see fit, i.g. 2D
Naming geo/plan/flow files is paramount, but I don't want to stand on my soap box too much on this blog post, so I will just leave it at that for now.
Draw a 2D perimeter in RAS Mapper (other options, but this is quick/easy)
Consider where your inflow and outflow boundary conditions will go
Determine cell size. For my example, I chose a really fine cell size of 10'x10' since my total modeled area was only 0.1 sq mile, or around 60 acres.
If you are in a much larger area taking a few minutes to utilize Refinement Regions (under 2D Flow Areas) is going to be your best bet. Something like 50ftx50ft cells, with refinement regions along the floodplain of 25ftx25ft. You can also import an effective floodplain if you have one handy as a starting point.
This yielded ~25,000 cells, which is going to be overkill for my purpose, but thats ok. The more cells you have the longer run time and possibly longer editing/error fixing (but keep in mind a truly good 2D model will have cell spacing, breaklines and tolerances set up so that manual errors in the mesh are kept to a minimum).
If you are in a much larger area taking a few minutes to utilize Refinement Regions (under 2D Flow Areas) is going to be your best bet. Something like 50ftx50ft cells, with refinement regions along the floodplain of 25ftx25ft. You can also import an effective floodplain if you have one handy as a starting point.
Draw breaklines on high spots that need to reinforced. This is often the bulk of 2D work, and where good modelers can set themselves apart. Identifying where the mesh needs attention to better simulate flooding is paramount. Knowing how to tweak the near spacing, far spacing, and all the other tricks and tweaks you can make with breaklines will expedite this effort.
Above I changed my breaklines from the RAS default of maroon to a lime green. The boundary condition (external) lines are shown as bright blue. My culvert as a SA/2D connection is also shown.
PS, if you are wondering how to display the DEM/topo over the aerial, right click the aerial in map layers and set the "Render Beneath Terrain" option to true. And Make sure you set the terrain to whatever transparency you desire!
Create a mannings n layer. See guidance from the rashms blog here. If it’s a small basin you can manually use GIS. If its larger, you might want to leverage NLCD and create a table to associate landuse to roughness values. Keep in mind ROG models typically need higher than you would think n values in the headwaters, but since we are loading this with a hydrograph, then the n-values you are used to are likely fine.
On ours, I am using the mannings n layer under the geometry, but its best to set up a landuse in the map layers file. I delineate the trees and roads in my watershed, then assign 0.1 & 0.035, respectively. I have the default n set to 0.06 (RAS defaults the default to this), and I like that for grass/shrubs so will leave those areas as default.
Input structures or just keep it simple and add a channel modification to your terrain and "burn" the culvert/bridge into the topo. I do both on this example.
In 2D areas, SA/2D connections are used to model bridges & culverts. The Bridges/Culverts layer in RAS mapper is designed for 1D modeling.
Create an unsteady flow file. This is your typical stream flow hydrograph. There are varied methods to do this, but ill provide a simple hydrograph for you to plug in in the downloadable excel file.
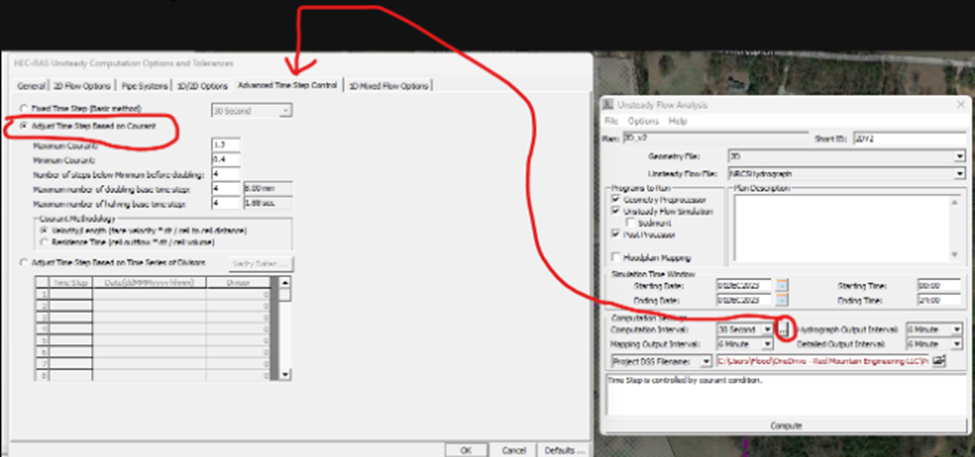
Create the unsteady plan file (running man up a hill). The computation interval (model time step), equation set, and # of cells are the biggest drivers for how long this simulation will run (well that, and whether you need to run it for 2 weeks of 2 hours or real world time).
For my 60 acre site with 25k cells, I am using 30 second base computation interval. I then use the courant method (1.5, 0.4, 4, 4, 4, respectively) to speed up things when there isn't a ton of water in the system and its not computationally intensive. See the screenshots above and below. I set the rest of my computation options to match the timestep of my input hydrograph, which was every 6 minutes.
Mash RUN!
And inevitably fix whatever error prevented you from actually running. Second times the charm here.
I included the 1D results for reference
Get familiar with viewing the timesteps and output files in RAS mapper.